Thursday, February 21, 2008

Will it hold?

I was noticing on another blog that when the person added filler to his epoxy it stayed about the same color as the wood.  I wish I would have found that color filler when I was at the store. Mine causes the epoxy to turn dark brown and be very noticeable. With this guys boat you can even tell he put in epoxy. That would explain why I keep thinking that every other boat I see is built much better than mine.  You just can’t see their epoxy.


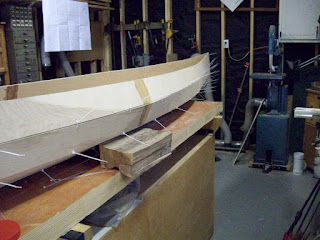
Last night I cut out about 80-90% of the zip ties holding this rig together and nothing fell apart.  There were a few places that I was not comfortable with how well the epoxy was hold so I left the zip ties in and added some more epoxy.

In one spot there was quite a large gap that I was shocked and pissed to see. It was not there before and I don’t know what I did to cause the gap now. I would have never left a gap this large and it will be quite visible.


Later I grabbed a file and started smoothing out some of the fillets which is tedious but not as bad as I thought it would be.  I would say maybe one or 2 evenings of cleaning things up and I will be ready to apply the Fiberglass tape

Wednesday, February 20, 2008

Observations after Filleting

I did not actually work on the canoe last night but I went to see how things held together.

The boat is very solid now. I took the forms out and it only had about 1” of spring back when I released the clamps. I thought that seemed pretty good.  What I did see is that there is a lot of clean up to do and that I need to be way more careful with clean up when I do the epoxy. Basically I am lazy and this is not a lazy mans game. I like to do the fun part of things and when clean up comes I usually put it off. Well I am going to have a lot of sanding to do as a result of that.  I think something more pliable and wider will be the way to go maybe I will try to use a piece of Formica. It will bend with the shape of the boat and should pick up more excess epoxy.  Judging by how things look so far this may end up being a painted canoe inside and out.  Nice thing is that decision can wait until very late. I have a hunch that when I try to sand everything smooth I will go through the top layer of the plywood in several places and it won’t be attractive. I will try to be very careful and avoid that.  If it looks nice no paint, if it looks like crap I paint it and nobody will know.


If you decide to build one of these boats. I suggest you buy the instructional video because I can say for sure that the farther I go on the more I realize that I don’t know what the hell I am doing.  But now I am on a mission.  I’ll figure this thing out eventually it just may weigh 800 lbs when I am done.  It will float though.


I will be out of town this weekend so no progress will be made over the weekend. I may get to it today or Thursday but that will be all.

Tuesday, February 19, 2008

More learning and some progress

Well the first thing to tell you is I think I found out what a chine is.

You see if a boat has a smooth curve to its hull from side to side not front to back it does not have chines. If it is put together with panels it will have angles at the joints. These I believe are the chines.

Sounds good to me. What do I really care. I just want to have a long pointy bucket that floats.

Sunday I went all around the boat with epoxy dabbing some here and there at the joints trying to tack the boat together so it could have the zip ties removed.

Monday I went and checked my results. Not so hot. Some of the places were bonded by many were not. So I moved to the next level and mixed up some epoxy with thickener. 3 squirts at a time. So I would not waste too much. And started trying to make some nice neat fillets (corner smoothing globs of goo) along the joints. This is not the easiest thing to do because you need it to be neat and you know everywhere that it dries that you don’t want it you are going to have to sand it away. That would be easy if the epoxy was not harder than the wood but it is so when you sand it you have to be careful not to sand through the plywood. I made a couple of spatula looking things to smooth it into the chines and they were pretty effective. They took about 10 seconds to shape on the sander. I used them to apply the epoxy and to smooth it out.

I thought previously that you did not put the fillet epoxy on until it was all tacked together and then you laid the fiberglass tape right on top of the fillet material. I think some people do it this way and others don’t. From what I can tell no 2 people have ever built a boat with the same technique. I think in the end success is based on how much epoxy you had to use to get your long pointy wooden bucket to float without leaking. Personally at this point I would be amazed if I finish this thing with just one gallon which sucks since as you can see over to the right they are not exactly giving this stuff away.

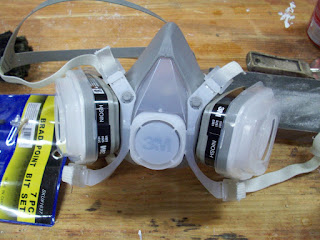
In the photos you see some after shots from adding some of the fillet material, the clippers that I have found very handy for clipping away zip ties. My spatula tools for applying epoxy. Some little V’s that I cut out to stick on the bottom of the front of the boat to squeeze those panels into place for gluing. The zip ties were just not cutting it. Finally there is a picture of the Respirator I have been using. It was $20 and I am real happy with it.

Hopefully tonight it will be held together better. If so I guess I will have some sanding to do to smooth the fillets. Then I will need to make some braces to replace the forms so that I can tape the inside seams of the boat. I need to find a better way to put on epoxy faster I think I may try some 2” foam brushes. So far I have just been using some ½” glue brushes but when I need to go 15’ 8” before the epoxy hardens that will not do


Sunday, February 17, 2008

A quick lesson in how to get rid of gaps in your canoe

This is really just helpful if the gap is near one of the ends of the boat.
So if you find a big gap which was not too hard on my canoe. You can get rid of it
 
Step 1 Find a big gap between your plywood strips.  This may be a chine. I have no idea what a chine is but I should probably learn what all of the boating terms mean and what they are. 
 
Step 2.  Take a picture of it.  Just kidding
 
Step 3. Cut the zipties from the gap to the end of the boat.  You will have to do this on both sides but if there is a gap it should be on both sides.
 
Step 4. Pull the plywood strip to the outside and let it hang free from the lower strip.  At this poin the gap should go away and there will be overlap at the end of the boat.
 
Step 5. Trace a line down the edge of the overlapping plywood.  Do this on both sides
 
Step 6.  Push the overlapping plywood to the inside of the boat and plane the strip down to the line. Do both sides
 
Step 7. Put the thing back together
 
Yeah you can tell I am amateur I did not take an after shot.  Just imagine it looks perfect.
 
One thing I did today was modify my saw horses so the boat could hang in a sling of rope and then I move the boat to the saw horses. It seems to help the boat stay in the proper shape better
 
This was the last gap I fixed and I started to spot epoxy the inside of the boat this afternoon.  Of course the second you start epoxying you see gaps everywhere that you missed.  Too bad they will get filled with thickened epoxy at this point. At least on my boat.  I eventually got plenty of spots tacked together so I can hopefully cut out the zip ties tomorrow.
 
I have no idea what I am supposed to do with the forms after I cut out the zip ties.  You can possibly fiberglass with them in place but If I remove them I am sure the boat will loose shape. I really don't know if this boat will end up the shape the forms hold it in when it is all said and done but as long as it does not leak I dont know if I really care.  All I really need is a point bucket that floats.

Friday, February 15, 2008

Solved one problem

I finally figured out that I could screw a block of wood onto the forms right at the top corner of  each side and then clamp the block of wood to the side of the boat.  Simple solution that is very helpful.  Now I can move on with getting the panels to fit together a little better and then get to glueing/epoxying. 

From what I read the hardest part is going to be putting in the Gunwales. Or to be specific getting the gunwales to bend while I try to install them.  I hope this is not too much of a bear but I think it will be.  I have not even decided on what wood I am going to use yet.  I like the idea of a white wood inside and a dark wood ousidee with the triangle in the front and back being dark to give a nice effect.  This is really all anyone will see so it needs to look good.


I don’t have any 16’ wood so I am not sure if I should go hunt some down or scarf some together.  Thank god for google

Thursday, February 14, 2008

Fitting everything together

Last night I worked for about and hour shaving planks here and there so things fit together better.

It ends up it is not so hard to do. I just clipped a few zip ties. Filed for a moment in the spot that looked like it needed work and strapped it back together.  I could probably leave things as they are but I will work a bit more on getting things as close as possible. I put some before and after shots in of one of the gaps I fixed


I still don’t know how you get the forms to stay in place while you shape the boat.  I see pictures on the web sites with the forms just sitting where they need to be no problem. That is not how things work for me


I thought I had a better picture of the form problem I have. But as you can see in the photo here 2 forms are in place and the left side is not pulling up on the form at all.  I don’t know if I am supposed to tack the board to the form or what.  Then when I put the last form in place the 2 forms you see become loose and just fall over.

Wednesday, February 13, 2008

Pictures of the forms

I took some pictures last night of the forms while I finished cutting them out.

There are 5 forms. A center form and then an A and B template.  I cut out all three shapes and then used the router to duplicated the A and B forms.  Using the router on the copies takes about 30 seconds as opposed to the hour it takes to lay out the whole thing and then cut it out with a circular saw.


I was fairly annoyed when I put in the end forms and all the center forms fell out. I don’t know how you are supposed to get them all to stand up.  Patience will win I suppose you just have to make sure everything is right before you start gluing


I also included some pictures of how the seams are lining up in the plywood.  As you can see some places the seams are perfect and in others there is a gap of about 3/16”  I am waiting to get the forms in place to start working on fixing the gaps.  They say you can have gaps as big as 1 cm and still be fine but I just don’t think Norm Abrams would approve of that.  Of course he would build the whole damn boat in 30 minutes but that is a different story.

Tuesday, February 12, 2008

Cutting the Forms

I had not seen anything about cutting out the forms that go inside the canoe while you are getting everything tightened up and fit together.  Now I know why.  It is crappy work.  They are not fun to cut out. There are tons of measurements that you can mess up,  and in general you are in the mood to work on a Canoe not some forms.  It is necessary so nothing to do but do it.  Realistically these may be the most important part of the build. How would I know?  I think they had better be right or else the canoe won’t be shaped right but I don’t know how exact they have to be to not cause problems. 


I took advice from somebody’s blog and cut these with a straight edge and a circular saw using ½ mdf.  I have so far cut 2 and have one left. I completely forgot to take pictures probably because I was not having much fun doing it.  Once I cut the 3 out I will use the outer ones as templates to cut their replicas with a router. That way I won’t have to do all of the measuring again.  I have a hunch that I won’t get to work on the boat again until Friday but we’ll see how things go.


Looking at the canoe all strapped together I think I have a lot of trimming to do to get all the seams to fit tightly together.  I don’t know if the forms will make things better or worse but you know what I am hoping for.


Saturday, February 9, 2008

Putting together the pieces


This is not a simple matter. I am surprised how hard it is to strap this thing together. I think it gets much easier after the first 4 pieces are together. It seems the key is getting the ends pulled together very well before starting the next piece.

I quickly ran out of zip ties I think it will take 250 to do it all

I plan to finish up tomorrow and maybe cut out the forms

I wrote this long winded blog entry last night explaining the rest of the process and it got lost. I was using that POS computer the OLPC. Maybe I will rewrite it tonight. For now here are some pictures


Thursday, February 7, 2008

Moving right along

Yesterday was one of those days where the visible progress is low but there was quite a bit of progress.

First off I went and found the right size zip ties. I had big ones and little ones and I needed the medium ones. If you go to the store looking you need the size that holds 45lbs the ones I got are 6 inches. The 75lb 8 inch size is too big and there is a 4” size that is too weak.

My son and I had already marked all of the places to drill holes for the ties so I just needed to drill the holes. I believe I already mentioned that a friend told me to drill the holes before epoxying the strips together so I would only need to drill 5 sets of holes instead of 10. That was a big time savings. I made a little jig for drilling that made sure all of the holes were perfectly vertical. It also makes sure that all of the holes are the same distance from the edge and will be covered by the fiberglass tape. It is just a block of wood with a large hole for seeing the line to align the jig with and a small hole to put the drill bit in.


Then on the underside a small block of wood is attached to line up with the edge of the plywood.


I had done a test piece to be sure the epoxy worked the night before which it did. So all that was left was to line up some panels and epoxy them.


The first thing I did was rearrange my shop. I put the table saw against the wall and moved the workbench which is on wheels out to the middle of the shop. It is 8 feet long so using that and some roller stands gave me a good workspace. My shop is only 24 feet long so leaving room for the door on one end and the band saw on the other end there was not much extra space.

I was surprised how hard it was to get everything clamped and straight. It took about ½ hour and 2 beers to get 4 pairs clamped up. Finally everything was straight and I put on the epoxy. 1 pump from each container was about perfect to do 4 seams. I put it on rather thick so I could sand it later.


Tonight I hope to epoxy some more and maybe draw out the shape of the forms that go inside the boat during construction. I may not have time though.


One last item, I sent an email to Fisher with a question about whether I need to put fiberglass inside and out or just inside an was impressed to get a response in just a few hours. They have been great to deal with in every way. Remember they are thousands of miles and an ocean away from me but are as helpful as if they lived around the corner.

I love the internet.


I usually tape both sides of the centreline seam. The bow and stern l use a large epoxy fillet on the inside and tape the outside. the other chine seams l tape the inside and simply fill the outside with thickened epoxy.
Regards,
Paul Fisher
SFDesign


Tuesday, February 5, 2008

Epoxy Instructions Link

http://www.gregboats.com/pages/epoxy.html


I went and bought all of the fiberglass and epoxy for this rig. It ends up you need West 105 and 205, plus 2" fiberglass tape. I was fairly surprised that it all added up to $244 by the time I was out the door. Hopefully I wont need any more epoxy

What I have learned today

I did not have time to go and buy the epoxy today but I did take some time to read about how far apart to make the stitch holes and how big to make them.  The website says to make the holes 1/8” if you are using zip ties and to put them 8” to 12” apart. I guess the straight sections don’t need as many stitches as the curves.


I did make a thin piece of flexible plywood with marks for the stitch locations that I can just hold up against the edge of all of my strips to mark where the holes need to be drilled. 


A friend gave me a good piece of advice which is to drill the stitch holes before I join the long strips together (turn the 20 pieces into 10) so that I only have to drill the holes 5 times instead of 10


Things I don’t know:

I have not found out how far from the edge to drill the holes for the stitches yet

I have lost the information that said which number West Epoxy to buy


Tonight I hope to buy the epoxy and zip ties and drill the holes

Sunday, February 3, 2008

Triming the Strips of wood

As I said before I was quite disappointed with how things went cutting out the strips of wood for the boat. So I just cut away from the line and planned on Planing or filing the boards to shape. If that did not work I would make MDF templates and cut them out with a router. It ended up that using the 3 tools shown in the pictures it was not too diffictult to get them all planed down to the correct shape. It took about 5 hours to cut out the last four sets of strips and plane them all.

The plane you see in the pictures with the blue on it is an interesting tool I bought at a woodworking show. If you are not good at sharpening it is the plan for you. It uses box cutter razor blades that are very cheap and rather than do any sharpening you just throw away the blade and move on.

If you are not currentl good at sharpening planes look up an article called "Scary Sharp" it explains how to sharpen a plane with wet sandpaper and it works very well I did this about a year ago and it was a tremendous help today when using the plane. I had read that the plane would dull very quickly on the plywood but I never had to sharpen mine all day.

I will buy some epoxy resin in the next few days to start attaching the panels together


The strips clamped into the face vice on my workbench


On the other end of the bench I clamped in a board to support the strips


I was able to put a clamp under the bench using the bench dog hole and clamp the strips to the side of the bench.
This was very helpful


Underside of bench


Plane that uses razor blades


Me Planing


I don't know what this is called but it works real well for this job


My hand plane


Making sure everything is square and stopping at the pencil line

Saturday, February 2, 2008

Cutting out the strips

I am really quite unhappy with how things are going so far with the cut out. As you can see from the pictures the jigsaw just does not cut straight enough for this. I know you are thinking user sucks but really it is not going well. The problem is not just cuting straight on the horizontal. On the vertical it wobbles too. If you get off line and turn the blade does not stay vertical.
I have a couple of ideas. First off I cut this first section proud of the line and I will try to grind, plane, sand or rasp to the line and see how that goes. If that does not go well I will make a template out of mdf and then cut the rest of the boards with a router and guide bearing. One way or another it will all turn into a boat one day
Posted by Picasa


Friday, February 1, 2008

Just found a good link that will be useful in the future I hope

I found out that Yahoo has a Selway-Fisher Builders group.


http://groups.yahoo.com/group/SFD_builders_sailors/messages


Shared Knowledge makes the world go round