Tuesday, March 24, 2009

Andy Roberts Canoe Trip on the Ochlocknee

Check this out for a seriously twisty river

http://trail.motionbased.com/trail/activity/7841579

Nice day for canoeing, trying out some pictures with the new waterproof camera.

Did a 14 mile trip in about 4 hours. More zigs and zags than you could ever imagine

Monday, March 2, 2009

Some Pictures of the cool stuff you see Canoeing in Florida


I have wanted to post these pictures for a long time. This is from a trip Canoeing here on the Wakulla River. I don't think I have ever been on the Wakulla and not seen Manatees. Quite a treat

Thursday, June 19, 2008

The Maiden Voyage


Now before you start getting all crazy on me saying where are the life jackets for those people I will tell you that the lake we are in there is only 1 to 3 feet deep everywhere we went.


Monday, June 9, 2008

It Floats, No leaks

I happen to have the good fortune of having a pool in my yard so it was pretty simple to go set the canoe in the pool on Saturday to see if it floats.

And it does.

I still needed to put on the varnish but no harm in seeing it float before that is done.

I had no problem finding volunteers to get in the boat.  Some even bothered to put on pants first!


There were no leaks which was nice and in general it did what you expect a big bucket to do when you put it in water. Float.

I was quite surprised how much the front end lifted up when I sat in the back seat.  Not at all like a rental canoe.

When I moved to the other end and sat in the “Front” seat everything leveled out just fine. As I was told it would.

If I canoe with one of the boys I guess I will have to carry a lot of beer to get the boat to ride level. The sacrifices I make.


All that is left is to put on some varnish and to buy two more bolts for the seats and put a bottom on the “Cup” holder and I will be finished.

I would rate the boat about a 4 to a 6 on quality because the finish just looks awful. As you can see in the pictures it is very spotty which I was not worried about during construction since I had planned to paint the outside. That was until I found out how much paint cost.  But the big problem you can not see in the pictures. The finish is just not smooth. You want it to look like glass and mine just looks runny and rippled.  I don’t know what I did wrong but it just is not something I will brag about.  I suppose I could spend 6 months and about $400 dollars getting it perfect but I am so sick of boat making that this will do.


Monday, June 2, 2008

What happened to the progress

Ok here are my excuses

A week ago Friday I used the last of my epoxy and then we went out of town for the 3 day weekend.

When I got back I was just plain tired and did not want to work on the boat.

Wednesday I was out biking, no work

Thursday I was out running, no work

Friday I was just Out!


Saturday I volunteered at a track meet all day so no work

Sunday it was about 100 degrees all day and too hot for me to go out to the shed.


Now it is Monday. I bought another quart of epoxy and the kids are gone for the week.

I hope to finish the boat this week.

If all goes well I will get the breast hooks done tonight

Epoxy the rest of the bottom tomorrow.

Epoxy the breast hooks Thursday along with putting on some varnish

Maybe some more varnish on Friday.

Saturday I could be done.


New expenses have been

Webbing

Stainless steel bolts

More Epoxy.


Building a boat is not cheap

Tuesday, May 20, 2008

A new Epoxy technique

I got on the message boards this weekend. Song of the Paddle being the one I frequent most and asked what the heck I was doing wrong with applying my epoxy and darned if the answer was not easy to find.

It was not really rocket science.  After you roll on the epoxy take a brush and smooth it out. That will pop all of the bubbles.

So I tried that with a small area Sunday and it worked perfectly. Then yesterday I went ahead and did the rest of the inside of the boat.

I had a little extra epoxy mixed up so I covered most of the gunwales.  Mahogany with a fresh finish on it. Was there any question whether this was going to look good or not?  Yes it looks fantastic.


So what is left.

1) Put some mounting blocks on the Breast hooks so that I can mount them to the boat

2) Sand the 2 Mahogany pieces that are at the end of the breast hooks

3) Round the gunwales at one end of the boat that some how I never did while I was sanding

4) Install the breast Hooks and end pieces

5) Make a cup holder add on to the rear thwart, and shape the whole thing

6) Sand the outside of the Hull one last time

7) Epoxy the Outside of the hull and the breast hooks

8) Varnish everything 2 or 3 times

9) Install the Thwarts and seats

10) Find some Brass Strips to make hooks for the ends of the boat.


Nothing major to do here but it all takes time and many of these steps require drying time for glue or finish prior to moving to the next step.

So it will still take time but nothing hard left to do

Monday, May 19, 2008

A weekend with some progress.

I said some progress not tons of progress.

I coated the inside of the boat with epoxy on Friday? and it was a real let down. I got tons of air bubbles in the finish.  I had to go back Sunday and wet sand the whole inside of the boat to get rid of the bubbles.

That was not too bad but more work than I wanted to do.  So instead of doing the outside Sunday, I sanded and I have not moved forward.  I think what I have to do is role on the finish and then brush it immediately after to pop the bubbles.


I did take some time while I watched MotoGp on Sunday to cover the seats with webbing. This was pretty easy and the roll of webbing I bought is so huge that I can probably recover the seats 4 or 5 times without running out.

I hope to move forward on the finish and get to the outside of the boat quickly. But everything is such a slow process. I had hopes of using the boat this coming weekend but I am pretty doubtful now. It is possible but doubtful.

Friday, May 16, 2008

Where am I

The webbing for my seats came in and of course my wife says I am boring for getting black webbing.  Every canoe I have seen used black so I thought it would be the best choice.

I started putting varnish on the seats so that I could then put on the webbing and the seats look great. That Cherry that the seats and thwarts are made of is really going to make the boat look good.

I am planning to start covering the boat with epoxy this weekend but I don’t know how fast or slow of a process that will be. Some epoxy and a few coats of varnish and I will be in the water.

Sunday, May 11, 2008

Hanging the seats


Very important. Measure the boat width at the spot where the seat will hang not up at the gunwale. My boat buldges out as it drops down from the top and I nearly ruined one of my seats.


This was really fairly easy. My wife and I leveled up the boat and then I used a level to figure out how long each hanger block needed to be. I had some pieces left over from trimming the seats that worked perfectly. I ran a hole through them at the drill press and viola.


In order to get everything to line up I drilled the front holes and then put every thing together with some zip ties (I don't have the hardware yet). Then I used a straight edge to line up where the second set of holes would need to be drilled. For some stupid reason I drilled the holes in my seats first which really made this more difficult. On the second seat I will drill the holes in the gunwales first and the seats last.

How to make your Breast hooks fit, the easy way

First off if you want to do your breast hooks the easy way all you have to do is nail a piece of plywood on top of the front of your boat and then run a router with a guide bearing around the edge of the boat. Everything will work perfectly in about 2 minutes.


If you want to inset you breasthooks it is a little more difficult and takes some thinking.


So here we go.


First off measure down each side of the boat as far as you want the breast hook to go and make a mark.

Second Clamp a straight edge across where the breast hook will end.

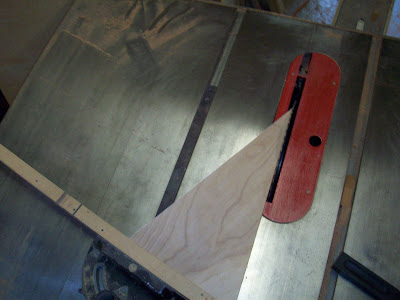
Third take your handy angle bevel tool and set it to the angle that is created by the straight edge and the side of the boat.


Fourth Go set your miter gauge to the angle you found on you angle tool.


Fifth Cut all of your miters with that one setting on the miter gauge.


Sixth attach some stop blocks that set the plywood at the same height as the gunwales.


When you are finished with that you can attach the breasthook with glue, nails or whatever you like.


This all seems simple but it took me several days to figure out how to do it and then an afternoon to actually do the work. I still have not attached the pieces because I don't have any stainless steel screws but that should not bee too hard

Tuesday, May 6, 2008

Breasts and Canoes!

Ok now that I have your attention I can talk about canoe building.

You can see from the pictures here that I am getting really close to finishing.

I sanded the final gunwale last night and it came out really good. The mahogany with the white stripe down the middle looks fantastic. I started to work on the breast hooks after I finished sanding and it ends up that this is not the easiest thing in the world to do.

My technique was to clamp a piece of 1/4” plywood to the top of the boat and then reach inside to scribe a line for where to cut. This all worked well but trying to cut that line perfectly on the bandsaw was not too successful. I had the piece close to perfect but this will be a primary focal point of the boat and I want it perfect. I may try to cut one with the table saw tonight and see if that gives a better result.

On an odd note I tried to buy the webbing for the seats yesterday and the place that advertises the webbing had gone out of business. Now it is back to the drawing board for the webbing. Not too big of a rush I should not need it for at least a week

Monday, May 5, 2008

Getting very close

This week was one of those weeks where you do the things that are not necessarily so hard to do but they make the boat look a lot more complete. I made the 2 seats which was quite easy using the tennoning jig here. I am very lucky that I have a mortiser in my shop that a guy let me borrow so doing the mortise and tennons for the seat is quite simple and accurate.

As you saw before I did the yoke and thwart. My wife pointed out that I need to put cup holders on the thwart so I have a little more work to do there.

You can also see that I have now glued on the Outwale on one side. And look how many clamps it took. Every clamp I own is on that boat. If you don’t have 20-30 clamps I would say don’t start building a boat. It takes a lot. It would have been great to have 20 C-Clamps instead of the spring clamps but I made it all work.

I was out of town Saturday so I did not get any work done on the boat but I did get to do much this weekend. I did sand the gunwale on the side that is complete. Make the tiny filler triangles to go in the gap at the nose of the boat (If you look at the picture and visualize where the other outwale will be there is a small triangle of vacant realestate that had to be filled) and then glue on the other outwale.

At this point I need to do the front and back compartments(with cup holders)

Make cupholders for the twart

Cut the seats to length and create a mounting system.

Put the webbing on the seats.

Sand a ton

Epoxy the whole thing

Varnish the whole thing

Maybe 2 weeks.

Sunday, April 27, 2008

The Yoke


I am still in the process of glueing on all of the pieces I made for the Gunwales. It is a long process because it takes so many clamps on each little piece. So I can only do 1 or 2 pieces at a time. While I was waiting around last night for the glue to dry - not much fun I cut out the Yoke and the thwart and some pieces to make the seats out of. I used Cherry because..... that is what I had. And because the sun will really make the cherry look good. I was going to use some white wood but I just did not have any.
Today I hope to glue on the last couple of gunwale pieces and route the edges of the thwart and yoke.
I need to find out what dimensions to use for the seats and I can put them together and finish them
Besides that I need to construct the front and back compartments.

This thing may actually hit the water one day

Tuesday, April 22, 2008

Inwales or Inwhales?

Not sure what they are really called.

I think I may be one of the least knowledgeable canoe builders there is. I know how to do woodworking but I can’t get the Canoe/Boat lingo down.


I have taken pictures on several occasions and they have come out blurry so this is the first time in a while I have had pictures.

I am in the process of gluing in the inwales with epoxy.  It requires so many clamps that I can’t do more than one piece at a time.

I decided to get creative at the ends of the boat and use relief cuts rather than steaming the wood to bend it.  I am not worried about strength with the relief cuts because I will have a triangle of wood in the point of the boat where that relief cuts are to give added support.  Besides that the relief cuts get filled with epoxy and essentially create a solid piece.  I also opted to cut 2 strips of wood for the inwales and glue them in separately. Once they are in you should not be able to tell that it is 2 strips of wood and there will be less stress on the wood than if it one large strip was being bent.  In case what I am saying is not clear.  Instead of using one piece of 15 x 35mm wood for the inwale I used 2   15x17mm strips.  I am gluing in the top piece first and then the bottom piece will be butted right up against the top piece. After sanding it will look 1 piece.  This also makes it easier to fit the cross pieces in.  I have no idea what they are called. 

I ended up using Mahogany for the gunwales.  I had some pieces that somebody had given me that use to be trim in their house so it worked out well.


I will start on the seats soon and probably use cherry.  I really should get on the stick and get the seats done so I can get this thing in the water soon. It is the perfect time to be using the canoe right now. 


If you have any tips for painting the outside of the boat please let me know what kind of paint you used or any tricks for applying it