Tuesday, May 20, 2008

A new Epoxy technique

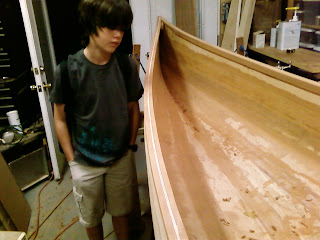
I got on the message boards this weekend. Song of the Paddle being the one I frequent most and asked what the heck I was doing wrong with applying my epoxy and darned if the answer was not easy to find.

It was not really rocket science.  After you roll on the epoxy take a brush and smooth it out. That will pop all of the bubbles.

So I tried that with a small area Sunday and it worked perfectly. Then yesterday I went ahead and did the rest of the inside of the boat.

I had a little extra epoxy mixed up so I covered most of the gunwales.  Mahogany with a fresh finish on it. Was there any question whether this was going to look good or not?  Yes it looks fantastic.


So what is left.

1) Put some mounting blocks on the Breast hooks so that I can mount them to the boat

2) Sand the 2 Mahogany pieces that are at the end of the breast hooks

3) Round the gunwales at one end of the boat that some how I never did while I was sanding

4) Install the breast Hooks and end pieces

5) Make a cup holder add on to the rear thwart, and shape the whole thing

6) Sand the outside of the Hull one last time

7) Epoxy the Outside of the hull and the breast hooks

8) Varnish everything 2 or 3 times

9) Install the Thwarts and seats

10) Find some Brass Strips to make hooks for the ends of the boat.


Nothing major to do here but it all takes time and many of these steps require drying time for glue or finish prior to moving to the next step.

So it will still take time but nothing hard left to do

Monday, May 19, 2008

A weekend with some progress.

I said some progress not tons of progress.

I coated the inside of the boat with epoxy on Friday? and it was a real let down. I got tons of air bubbles in the finish.  I had to go back Sunday and wet sand the whole inside of the boat to get rid of the bubbles.

That was not too bad but more work than I wanted to do.  So instead of doing the outside Sunday, I sanded and I have not moved forward.  I think what I have to do is role on the finish and then brush it immediately after to pop the bubbles.


I did take some time while I watched MotoGp on Sunday to cover the seats with webbing. This was pretty easy and the roll of webbing I bought is so huge that I can probably recover the seats 4 or 5 times without running out.

I hope to move forward on the finish and get to the outside of the boat quickly. But everything is such a slow process. I had hopes of using the boat this coming weekend but I am pretty doubtful now. It is possible but doubtful.

Friday, May 16, 2008

Where am I

The webbing for my seats came in and of course my wife says I am boring for getting black webbing.  Every canoe I have seen used black so I thought it would be the best choice.

I started putting varnish on the seats so that I could then put on the webbing and the seats look great. That Cherry that the seats and thwarts are made of is really going to make the boat look good.

I am planning to start covering the boat with epoxy this weekend but I don’t know how fast or slow of a process that will be. Some epoxy and a few coats of varnish and I will be in the water.

Sunday, May 11, 2008

Hanging the seats


Very important. Measure the boat width at the spot where the seat will hang not up at the gunwale. My boat buldges out as it drops down from the top and I nearly ruined one of my seats.


This was really fairly easy. My wife and I leveled up the boat and then I used a level to figure out how long each hanger block needed to be. I had some pieces left over from trimming the seats that worked perfectly. I ran a hole through them at the drill press and viola.


In order to get everything to line up I drilled the front holes and then put every thing together with some zip ties (I don't have the hardware yet). Then I used a straight edge to line up where the second set of holes would need to be drilled. For some stupid reason I drilled the holes in my seats first which really made this more difficult. On the second seat I will drill the holes in the gunwales first and the seats last.

How to make your Breast hooks fit, the easy way

First off if you want to do your breast hooks the easy way all you have to do is nail a piece of plywood on top of the front of your boat and then run a router with a guide bearing around the edge of the boat. Everything will work perfectly in about 2 minutes.


If you want to inset you breasthooks it is a little more difficult and takes some thinking.


So here we go.


First off measure down each side of the boat as far as you want the breast hook to go and make a mark.

Second Clamp a straight edge across where the breast hook will end.

Third take your handy angle bevel tool and set it to the angle that is created by the straight edge and the side of the boat.


Fourth Go set your miter gauge to the angle you found on you angle tool.


Fifth Cut all of your miters with that one setting on the miter gauge.


Sixth attach some stop blocks that set the plywood at the same height as the gunwales.


When you are finished with that you can attach the breasthook with glue, nails or whatever you like.


This all seems simple but it took me several days to figure out how to do it and then an afternoon to actually do the work. I still have not attached the pieces because I don't have any stainless steel screws but that should not bee too hard

Tuesday, May 6, 2008

Breasts and Canoes!

Ok now that I have your attention I can talk about canoe building.

You can see from the pictures here that I am getting really close to finishing.

I sanded the final gunwale last night and it came out really good. The mahogany with the white stripe down the middle looks fantastic. I started to work on the breast hooks after I finished sanding and it ends up that this is not the easiest thing in the world to do.

My technique was to clamp a piece of 1/4” plywood to the top of the boat and then reach inside to scribe a line for where to cut. This all worked well but trying to cut that line perfectly on the bandsaw was not too successful. I had the piece close to perfect but this will be a primary focal point of the boat and I want it perfect. I may try to cut one with the table saw tonight and see if that gives a better result.

On an odd note I tried to buy the webbing for the seats yesterday and the place that advertises the webbing had gone out of business. Now it is back to the drawing board for the webbing. Not too big of a rush I should not need it for at least a week

Monday, May 5, 2008

Getting very close

This week was one of those weeks where you do the things that are not necessarily so hard to do but they make the boat look a lot more complete. I made the 2 seats which was quite easy using the tennoning jig here. I am very lucky that I have a mortiser in my shop that a guy let me borrow so doing the mortise and tennons for the seat is quite simple and accurate.

As you saw before I did the yoke and thwart. My wife pointed out that I need to put cup holders on the thwart so I have a little more work to do there.

You can also see that I have now glued on the Outwale on one side. And look how many clamps it took. Every clamp I own is on that boat. If you don’t have 20-30 clamps I would say don’t start building a boat. It takes a lot. It would have been great to have 20 C-Clamps instead of the spring clamps but I made it all work.

I was out of town Saturday so I did not get any work done on the boat but I did get to do much this weekend. I did sand the gunwale on the side that is complete. Make the tiny filler triangles to go in the gap at the nose of the boat (If you look at the picture and visualize where the other outwale will be there is a small triangle of vacant realestate that had to be filled) and then glue on the other outwale.

At this point I need to do the front and back compartments(with cup holders)

Make cupholders for the twart

Cut the seats to length and create a mounting system.

Put the webbing on the seats.

Sand a ton

Epoxy the whole thing

Varnish the whole thing

Maybe 2 weeks.